Thursday, January 30, 2014

how to fold catalogue-shoot-ready towels

{via}

have you ever wondered how they get towels in catalogues and store displays to look so perfect? i used to do visual merchandising for a high-end retailer, so i know the secret: obsessive compulsive disorder.

{via}

with the merchandising design team, i photographed towel folding tutorials that went into visual bibles binders sent to each store across the country. we poked, prodded, fluffed and smoothed every single towel over and over again, and that was after they were folded. but oh, were they beautiful. and if you dream of having an open etegere in your bathroom that is styled just so, you're going to have to commit to the same. but two pieces of good news: its actually very easy once you get the hang of it, and its worth it.

ready?


step zero. buy good towels. you don't have to spend a fortune, but find something with some fluff and some weight to it. thin towels will never look as good folded as their thicker, thirstier counterparts. the towels i'm using are from restoration hardware.

step one. lay the towel flat on a large surface (a bed or table works the best), with the tag in the bottom right corner and the "tag side" of the towel facing up. run your hands over the towel to smooth out the wrinkles as much as possible.


step two. bring the bottom edge up to fold it in half. you need to leave a "lip" at the top, meaning your bottom edge will be slightly lower than the top. run your hands over the towel to smooth the wrinkles out. it is essential to smooth the towel as you complete each step.


here is a closer picture of about how much "lip" to leave at the top. it should be about 1/2" or roughly the same amount as your finished seam. too much of a gap here will cause a saggy outer edge when you're done. too little allowance, and the inside of the towel will stick out of your final fold.


your tag should now be here, in the upper right hand corner, face down. tuck it in so that it is not showing. we keep the tag here so that it does not stick out of the finished towel.


step three. bring the bottom edge up to the top to fold it in half a second time. the bottom edge should line up with your lower edge from before, so the same "lip" is still at the top. smooth out the wrinkles.

step four. rotate the towel so that your body is positioned at the bottom of the long skinny rectangle. if you want your dobby (that is the decorative stripe on either end of some towels) and your "ugly" side to be to the right when you're done, then rotate your towel so the open edge is on your right. if you want your dobby facing left, rotate your towel so the open edge is on your left. if you don't care, and have no idea what i'm saying, just keep the open edge to the right. smooth your towel.

step five. imagine your towel is divided into thirds. you're going to fold the bottom third up over the middle third. the best way to do this is to press down on the top with your fingers while your thumbs are underneath, and use your thumbs to flip the towel over. this just gives you a crisp, tight fold.


smooth your towel

it should now look like this. make sure the fold is tight, all the edges are lined up, and there are no wrinkles.

step six. now you're going to fold what is left in half, so the bottom edge comes up to the top edge. use the same trick as before to make the fold, pressing with your fingers and letting your thumbs flip the towel.


now your towel will look like this. you are not done. even though you folded it perfectly, it is still lumpy and wrinkly. now is where the prodding and poking happens. just pat and smooth the towel until it is wrinkle-free and has a uniform shape. the top and bottom should be parallel lines as you look at it.

there! isn't that gorgeous? 


now, here is another tip. set that one aside, and fold your other towels. stack them on top of each other before you place them into the cabinet. it is just as important how you place them in the cabinet as how you fold them. if you toss them on the shelf in a lumpy heap, you wasted all of that effort to fold them perfectly.

when you stack them, make sure the outer edges are lined up, and the dobby makes a continuous line that flows from one towel to the next.

to put them into your cabinet, hold the whole stack with one hand on top and one hand underneath. slide the towels carefully into place. pat and primp the stack so that it looks neat and tidy. if one towel is too thin, push on it with your fingers a little bit to make it fatter. if one is too fat, squeeze it or press it down to make it thinner. the point is to have every towel the same width and height. keep messing with them until they do what you want.

now you are ready to style your bathroom vanity, etegere, or world's most beautiful linen closet.


 (above is what we consider the "ugly" side of the towel. it would be the side to position away from sight as you come into the bathroom). 


can you believe that was only six steps? like i said, o.c.d.
you'll get there.

by the way, catalogue? wait, isn't it catalog? i decided i can't decide.

Wednesday, January 29, 2014

kitchen: the dream


now that you've seen what our kitchen looks like, and our very real budget, let's spend a few minutes indulging fantasy. here are some beautiful and inspiring kitchens that i just had to share with you before we left the topic. (don't worry, it will only be a temporary pause. i can't stay away from the subject of kitchens for long).


i love the (huge) marble island and the sunny breakfast spot in this kitchen, from architectural digest


i'm never happy with rooms that turn out looking too polished. the distressed and rustic elements here keep that from happening. from alkemie (left) and country living (right).


this kitchen is still one of my favorites of all time. it is the farmhouse kitchen by sarah richardson featured on her show, sarah's house. the yellow corbels, vintage accessories, distressed floors, and kenmore pro appliances are all must-have items on my dream kitchen list.


this eat-in area has beautiful french doors that open to a beautiful backyard. and light blue painted chairs! from traditional home.


i apologize for the poor quality of this photo- its one of those you snap from a magazine before you force yourself to throw it away. from bhg kitchen and bath ideas, october 2011. 


this might be a bit too stark, but i really truly love it anyways, especially the industrial pendants and salvaged island and vintage appliances. from dustjacket attic.


i remember seeing this in a magazine a couple years ago, and it inspired the robins egg blue color in the back of my cabinets. from better homes and gardens.


this kitchen has it all- large island, marble counters, subway tile, a great ceiling, a breakfast banquette and gorgeous windows. its so bright and sunny.


this kitchen inspired our beam and beadboard ceiling. i've had the page ripped out from a magazine and tacked to my bulletin board since we moved in. unfortunately, i tossed the rest of the magazine so i can't tell you the source!


twenty years after its time, i'm sure someone thought this vintage stove was an eye sore. but now its glorious. you see? there is hope for mine.


i'm a fan of how this kitchen mixes antique and modern, rustic and glam. i'm also starting to reeeaaally like black window muttons. mutton. that's a horrible word. is there a better one for those things? image from free house interior design ideas.


see how these cabinet doors fit inside their frames? that's the kind i want. spotted at mix and chic.


are two islands a little overkill? nah. from veranda.


this kitchen is too grey, perhaps, (as my husband often says, "are you sure it doesn't have too much color?"), but the layout is perfect. and i love the wall of cabinets on the right. from atlanta homes & lifestyles.


ginormous window behind a farmhouse sink. sigh. and those ceiling beams and lanterns are incredible.


well, there you have it. some of my favorite kitchens. if the daydreaming ended too soon for you, there's more to be found on my kitchen board at pinterest.

back to life, back to reality.

Sunday, January 26, 2014

kitchen: budget, source list, and favorite things


the goal in this kitchen was to make it charming without spending any major money. we operate on a "just in time" system regarding the big stuff in the house, so we don't replace things like appliances unless we have to. which means i'm daily hoping the hideous double oven will die. so far, no such luck!
 
here is the budget-breakdown, a list of resources, and a few of my favorite things from the kitchen. for the full article, more photos and before & afters, click here.

the budget:

paint: $150
beam: $50
beadboard wallpaper: $20 (on sale at the land of nod outlet)
crown moulding: $85
glass cabinet hardware: $50 (in the clearance section at homegoods)
shelf paper for cabinet backs: $110
accessories & dishes: $0 (obviously not, but they were all in my collection before we moved in, so i'm not counting them in the cost of this project)

total: $465


source list:

paint:
     cabinet primer- zinsser cover stain primer/ stain blocker/ bond coat, white
     cabinet paint- sherwin williams pro classic, colormatched to martha stewart pure white
     (these were the products recommended to us as we were painting laminate, and they 
     needed to stick. they definitely lived up to expectations.)
     walls: martha stewart salt glaze
     peninsula: martha stewart aegean blue

shelf paper, upper cabinet backs: aquamarine #150 from chic shelf paper

 
chic shelf paper will custom cut the paper according to your measurements for a small upcharge. i took advantage and ordered my pieces pre-cut. i'm glad i did because it was so, so easy to install. 

cabinet knobs: violette knob from anthropologie (mine are this same knob, but are clear, which doesn't seem available anymore. probably explains how the clear ones ended up at homegoods!)

 
now that i see these mint green ones, though, wow....it is tempting to start over. they are so darling!

ceiling wallpaper: ours was from land of nod, which no longer seems to be selling it. i found something similar here


finally, here are a few of my favorite things in the kitchen...and where you can find them or something similar:

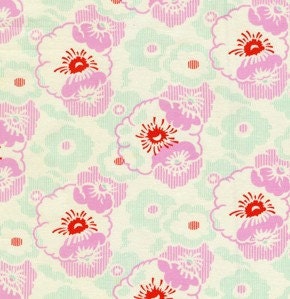
the fabric for the under-counter curtain is wash day ticking in pink, from the nicey jane line by heather bailey. i sewed a simple rod pocket and it is hanging on a dowel. the dowel is cut to the exact width of the opening, and has rubber caps on the end to keep it from slipping. a tension rod would also work.

Heather Bailey, Nicey Jane, Wash Day Ticking in Pink (HB13) - 1 Yard


chalkboard: this is actually a fake. i bought a frame from goodwill, removed the glass, and spray painted it white. the "chalkboard" is black foam board, cut to fit the frame. i planned on my chalk art being permanent, but who knew? it actually erases and i've changed it a few times.
a "keep calm and eat a cupcake" print from the keep calm shop on etsy, vintage plates from goodwill, and a framed book page fill the wall space on this side of the kitchen.


this mint scalloped cookie jar is from world market. i use it to store coffee, and another cookie jar houses cookie cutters.


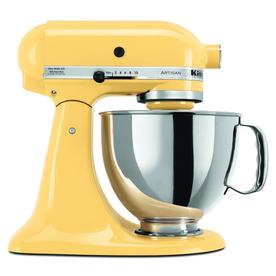
i absolutely adore my kitchenaid mixer, in majestic yellow.

KitchenAid Artisan Series 5-Quart 10-Speed Majestic Yellow Stand Mixer

our plates are from the aspen line by crate & barrel. we have had them for 10 years and honestly not a single piece has a chip or a scratch. they are wonderfully durable, not too heavy, and go with everything.


this kitchen would not be complete without its collection of white cake stands. i've received most as gifts over time from my sweet mom and husband, and they are from all over the place. but if you're looking for a great single source, i love just about every one the martha stewart collection turns out.


if there is anything i've left out, and you'd like to know where it came from, please let me know in the comments!

happy (almost) monday,
laura
Related Posts Plugin for WordPress, Blogger...
 
Blogging tips