Showing posts with label holidays. Show all posts

Wednesday, December 28, 2016

Holiday Table


Merry Christmas & Happy New Year!

I hope you are enjoying the season. If your holidays are anything like mine, your life was like a freight train for all of December, which crashed violently on the 25th, turning your house into a pile of rubble, leading you to hibernate in your pajamas with your phone off ever since.

The holiday recovery zone may be one of my favorite places of all time. Post 12/25 is truly when all is calm and all is bright. (Unless you count the near-constant sibling bickering of my children, which I am not, because I am totally ignoring it). I haven't left my house or my "eating pants" (pants with an elastic waistband, for those of you who didn't go to college with Dan Novak, who coined the term) in days.

I've read a book and a half, I've sat and thought, eaten left-over party platter cheese and crackers for lunch, talked on the phone (remember THAT?!), and generally been a totally happy and relaxed hermit.

The reason this vacation is so needed is because, as I said, December was bonkers. And I mean BONKERS. I find myself wondering how Christmas turned into such a three-ring circus. And how I can avoid that next year. It will take me the next 10 months to figure that out but SOMEHOW something must be done. The only thing I know for sure is that it is completely my fault. [Evidence]

At some point, we'll have to fully unpack my issues, which essentially fall into the category of thinking I can and should do all the things, when in reality I cannot and should not be doing all the things.

But for now, whatever, Pretty Table!

One of the things I had really wanted to do but just couldn't get done earlier in the month was participating in Minted's #MintedHolidayStyle contest. They asked me, along with a handful of others, if we would like to share a festive tablescape on our blog & Instagram featuring their new matched napkin sets. You have to understand, every word of that is like irresistible candy to a blogger. I had to say yes! But time, opportunity, and good lighting rarely converge in the best of months for this type of project, let alone in a jam-packed December.

So I'm sharing it now! I used the lazy afternoons this week to shop for, stage, set and shoot a tablescape, just. for. fun. This is probably not most people's idea of a good time, but to me, arranging flowers and setting out forks and napkins -- without having to actually cook food or put away the laundry on my love seat -- is luxury of the highest order.


And bonus, I got to practice my manual shooting skills! Ah, blissful vacation afternoon. And unlike a real party, I don't have to clean up the dirty socks my son threw on the floor, or the stack of broken- down gift boxes next to our table. I just had to crop them out.

Here's wishing you a relaxed and blissful end to 2016, and much joy in the New Year!

Tuesday, December 13, 2016

Our Christmas Cards


It is no secret that I am a huge paper nerd, and Christmas cards are the ultimate chance for me to geek out on stationary. For the second year in a row, I chose Minted for our Christmas cards, and I couldn't be happier with how they turned out! You saw the contenders, and now here is the design & photo we chose:


I had so much fun in the moment when our kids were all making kissy faces and cracking each other up. We always (kinda) wish we could get that just-perfect picture of all three looking and smiling at the camera, but really this is how I will remember them. Three silly stooges, best friends. So it captures them better than the canned picture ever could.


Now it's time to actually send them! Thankfully, Minted still has my address book on file, and they offer pre-printing of every envelope- for free. This is an amazing time saver, especially in a busy season. And I love that because my hands don't have as much burden to do the addressing, I can take the time to write a little note to each recipient.

There's still plenty of time to send cards this year, especially with the trend of New Year's cards growing stronger all the time. It's one item that you can cross off the Must-Do-Before-December-25th list, to reduce the busyness of the season and extend the fun.

Merry Christmas & Warm Wishes from the Irions!

This post was sponsored by Minted, for which I am very grateful. As always, all opinions and reviews are 100% my own, and I only share companies with you that I would share with my best friends at our weekly playdate. 

Save

Friday, December 9, 2016

How (Not) to Flock a Christmas Tree


Ah, where to begin. I want to tell you about my day yesterday.

Should I start with when I got electrocuted?

Maybe when the Christmas tree fell over in my living room. Twice.

Or the part where I dropped a cinder block on my foot.

Or maybe we should start when I accidentally showed an entire preschool my butt.

UGH.

Let's rewind to the very beginning of this story, about a year ago, when this woman slayed me with her unattainable fantasy Christmas house.

I've been obsessed with the idea of replicating every square inch, down to the last snowy pine needle, ever since. I've dreamed of the perfect flocked Christmas tree, blush pink ornaments, ribbons abounding, fresh greens lushly draped over the banister. I've dreamed of it for a whole year.

It turns out that 365 days is a long time for a dream to brew. Especially one of the variety that's going to cost more than just dollars. These dreams end up getting paid for in sanity, and yesterday my sanity took out a second mortgage.

The first step to realizing the dream was a flocked Christmas tree.

For those of you who don't know, "flocking" is the (rather poorly named) process of putting fake snow on your tree to give it that wintery wonderland feeling. Naturally I turned to the blogosphere for guidance, where I was warned of the terrors of the process. Psh. Warning brushed aside like yesterday's flocking. This dream would not die.

I have a very reliable and lovely faux Christmas tree. But it's not flocked, so it's dead to me now. It was relegated to the playroom, where the kids could decorate it to their heart's content. Still, I knew that some $800 designer flocked tree wasn't going to happen, so I convinced Ryan we could just buy a $32.99 real tree at Costco and flock it ourselves. (Which, yes, Holly, IS legal in Illinois. Eye roll.)

Three cans of Sno Blo and a hostage tree tied to my van later, the plan was underway.


It's been 10 years since Ryan and I have purchased a real tree. The last time we did, a fleet of giant bugs bore out of it and ransacked our living room. No really, I have pictures of Ryan posing for our newlywed Christmas picture holding a can of Raid.

Since then, real trees haven't really been our "thing." But they're unbeatably gorgeous! The smell! And so perfectly imperfect! I was really excited to redeem the real tree experience, and fully prepared for a little more mess than usual. First step, wrestle it into the house. Pine needles and sap everywhere. No problem. Next step, saw off the bottom so that it can suck up water. Sawdust, pine needles and sap everywhere. OK, we can do this. Next, set it in its stand in the living room and water it. Try to crawl under the tree and pour the water in without gouging your eyes out on a pine branch. Water, sawdust, pine needles and sap everywhere. Wait two days and recover from this experience.

Finally the fates converge- it's not too cold, too dark, or too windy, and I have a few hours of free time. It's time to flock the tree! It takes two of us to get it back out of the stand and carried through the house (water, pine needles and sap everywhere) and out into the backyard. We set it up in the stand. The wind blows it over.

We set it back up in the stand. Over the course of two hours I spray three light coats of flocking, getting more excited with each one. It's so pretty!!! All the branches are heavy with realistic looking snow. It's a winter wonderland tree if there ever was one! I'm so excited. I wait impatiently for hours for it to dry. Get sidetracked, finally look out the window- it's face down in the yard. My grass is now perfectly flocked...the tree, not so much anymore. It basically looks like it has a light dusting of baby powder on it. Or it's just a blue spruce. Commence inward crying.


It's now dark, and freezing cold, so even if I could run to the store to buy more cans of flocking and start over, it would never dry in time or survive the overnight wind. I had to just accept how it looked and bring it inside. Sadly, between squeezing it back through our back door and wrestling it into its stand yet another time, most of the remaining flocking flocked off. So the whole thing was pretty much an exercise in futility.


There's more. So, after taking another two (maybe four) days to recover from the (not) flocking, I finally got set to decorate. The boys were all out so it was just my daughter and me. We put on the Christmas music, the fireplace was glowing, we were unpacking ornaments and it was completely idyllic...finally! This is how Christmas is supposed to be!

And then the tree electrocuted me. One of the lights was missing its bulb, but still managed to be completely live. The first time my hand hit it, I thought I had gotten a prick from broken glass. It was a sharp sting but barely noticeable. I made a mental note to repair that bulb. The next time my hand nicked it, I reeled back screaming as a huge jolt surged through my entire body! That was my first experience getting electrocuted, and I have to say, it's not that cool. We proceeded to hang the rest of the ornaments with the tree lights OFF.

Which is a good thing, because when the tree FELL OVER a few minutes later, water spilled all over the floor and the dangling light cord. So I'm guessing my number had been called for electrocution that day one way or another.


The collapse was totally my fault. I'm used to decorating a fake tree, which is sturdy and not evil. So, when I put ornaments on only one side of it, it doesn't fall over. Turns out with a real tree that hates you, you can't do that or it will crush you and your entire family. Noted.

As I struggled to keep the tree upright, I sent my daughter running for twine that I could tie to the tree to anchor it. Anchor to what, I had no plan. She got the twine, I tied it to the top, then I had her hold it up (not my best parenting moment), while I searched for an anchor.

Cinder block! Naturally! We have them on the porch holding up our planters. In my hysterical rush to save my daughter's burdened, tree-supporting arms, I ran through the house with the cinder block (totally covered in spiders, webs, dirt and all kinds of ick from living in a porch planter all summer), and somehow didn't trip and fall with it. That was the good news. The bad news is, once I had it tied to the tree, almost ready to set it in place and declare victory, the twine snapped in half, so that the cinder block fell on my foot instead, while the tree fell the other way onto my daughter. So if you're keeping score:

Times electrocuted: Two
Family members hit by falling tree: Two
Feet crushed by cinder block: One
Ornaments shattered in carpet: Roughly one dozen
Carpet saturated with tree water: 3 square feet
New spiders in residence: Innumerable
Expletives uttered in front of minors: ZERO, for which I (and the Holy Spirit) deserve massive credit.


I am proud to say, we recovered. First we sat and stared at the pine needle/ water/ flocking/ broken ornament stew on our carpet and contemplated walking away and getting chocolate ice cream. But instead we told ourselves to Woman Up. Eva and I found some sturdy ribbon, anchored the tree to that cinder block and showed it who was boss. Then we waited for Ryan to come home and rescue us. OK, fine! I admit it! I am not a feminist! He swooped in like a knight in shining armor on a carpet shampooing steed.

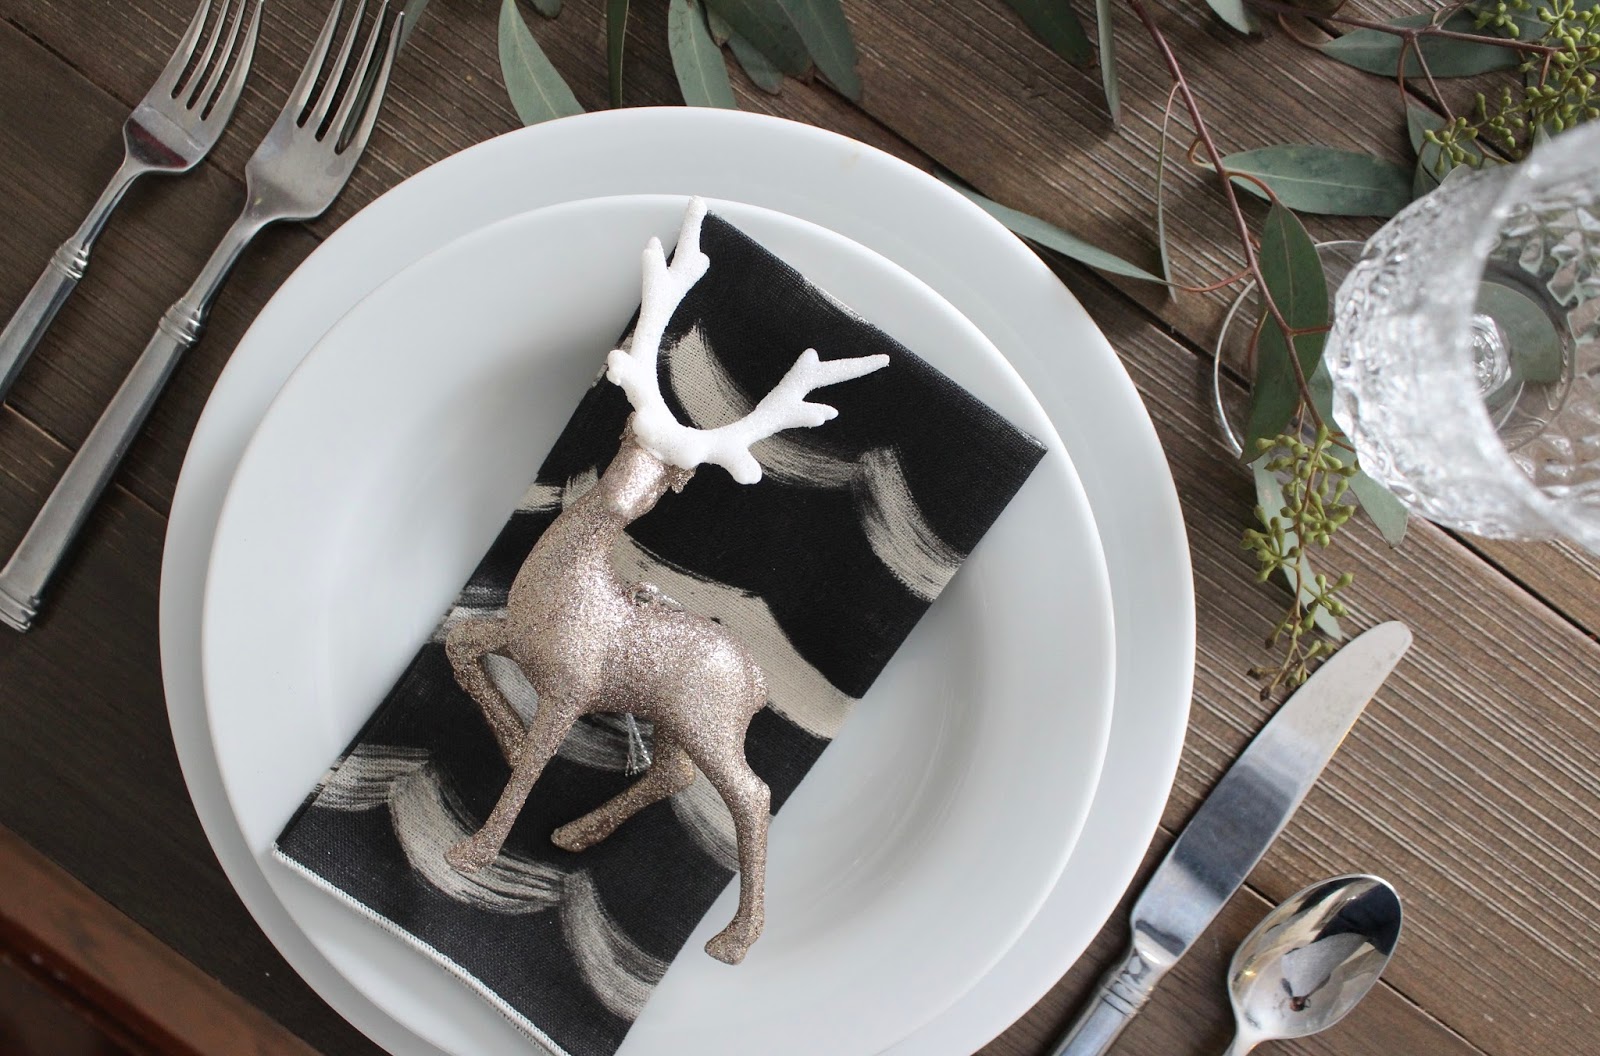
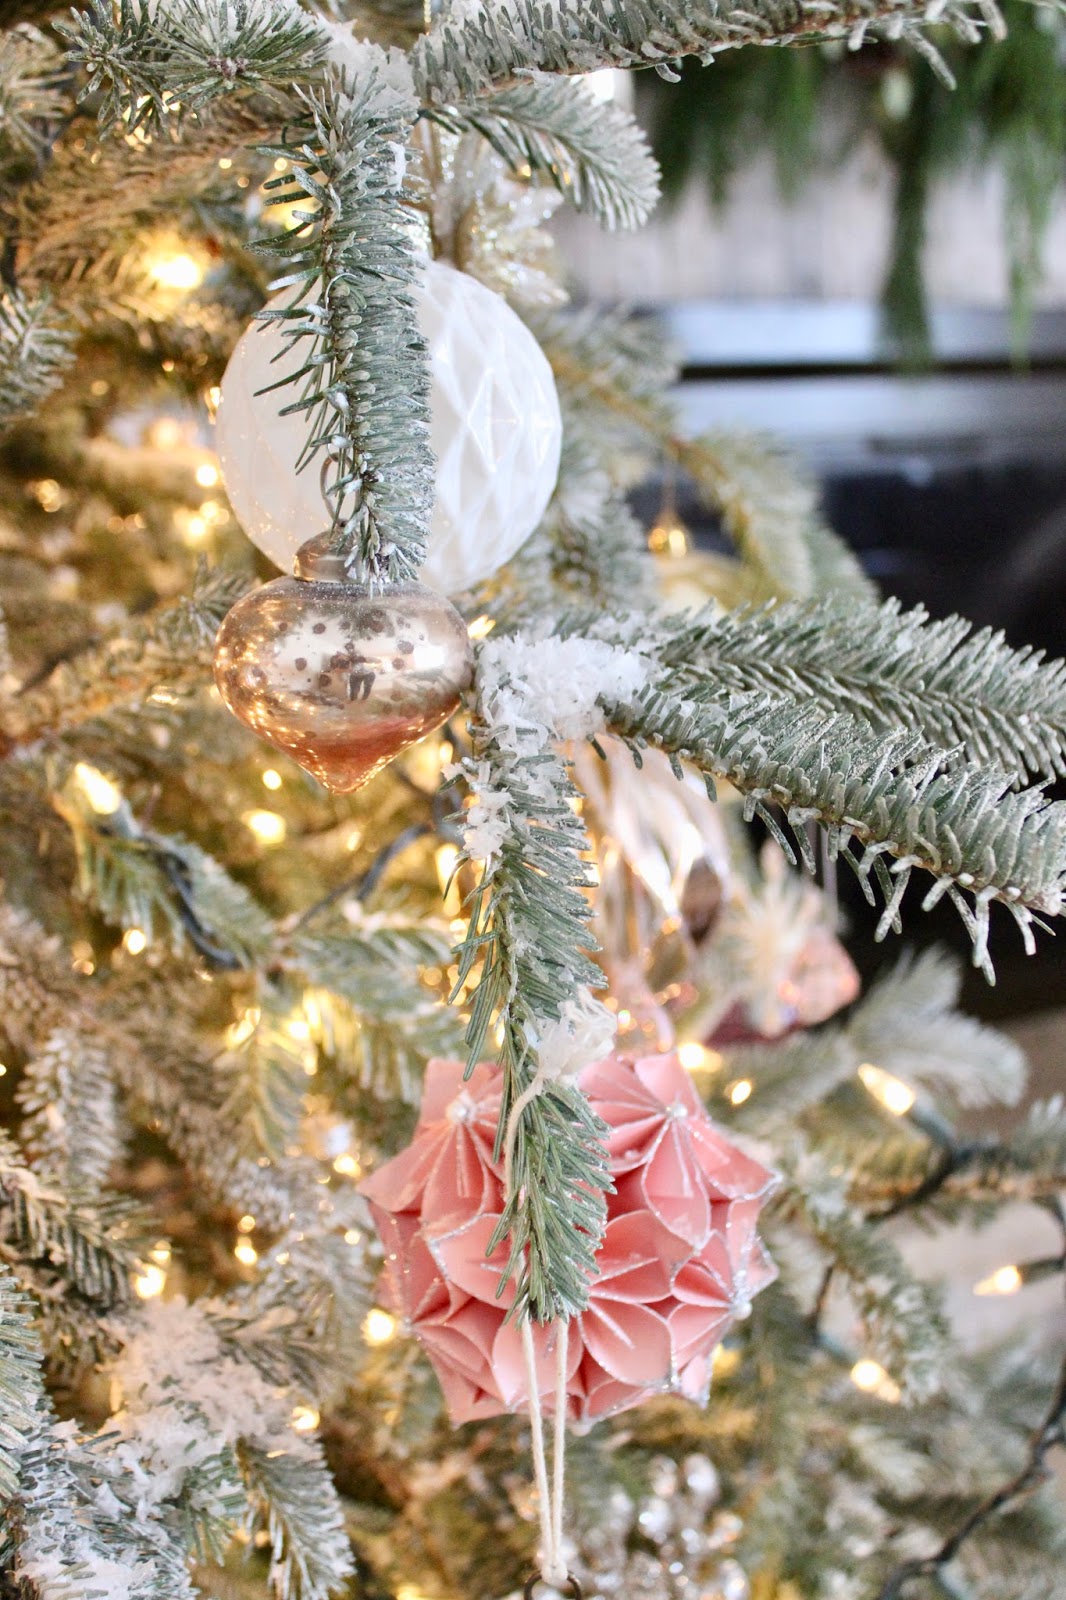
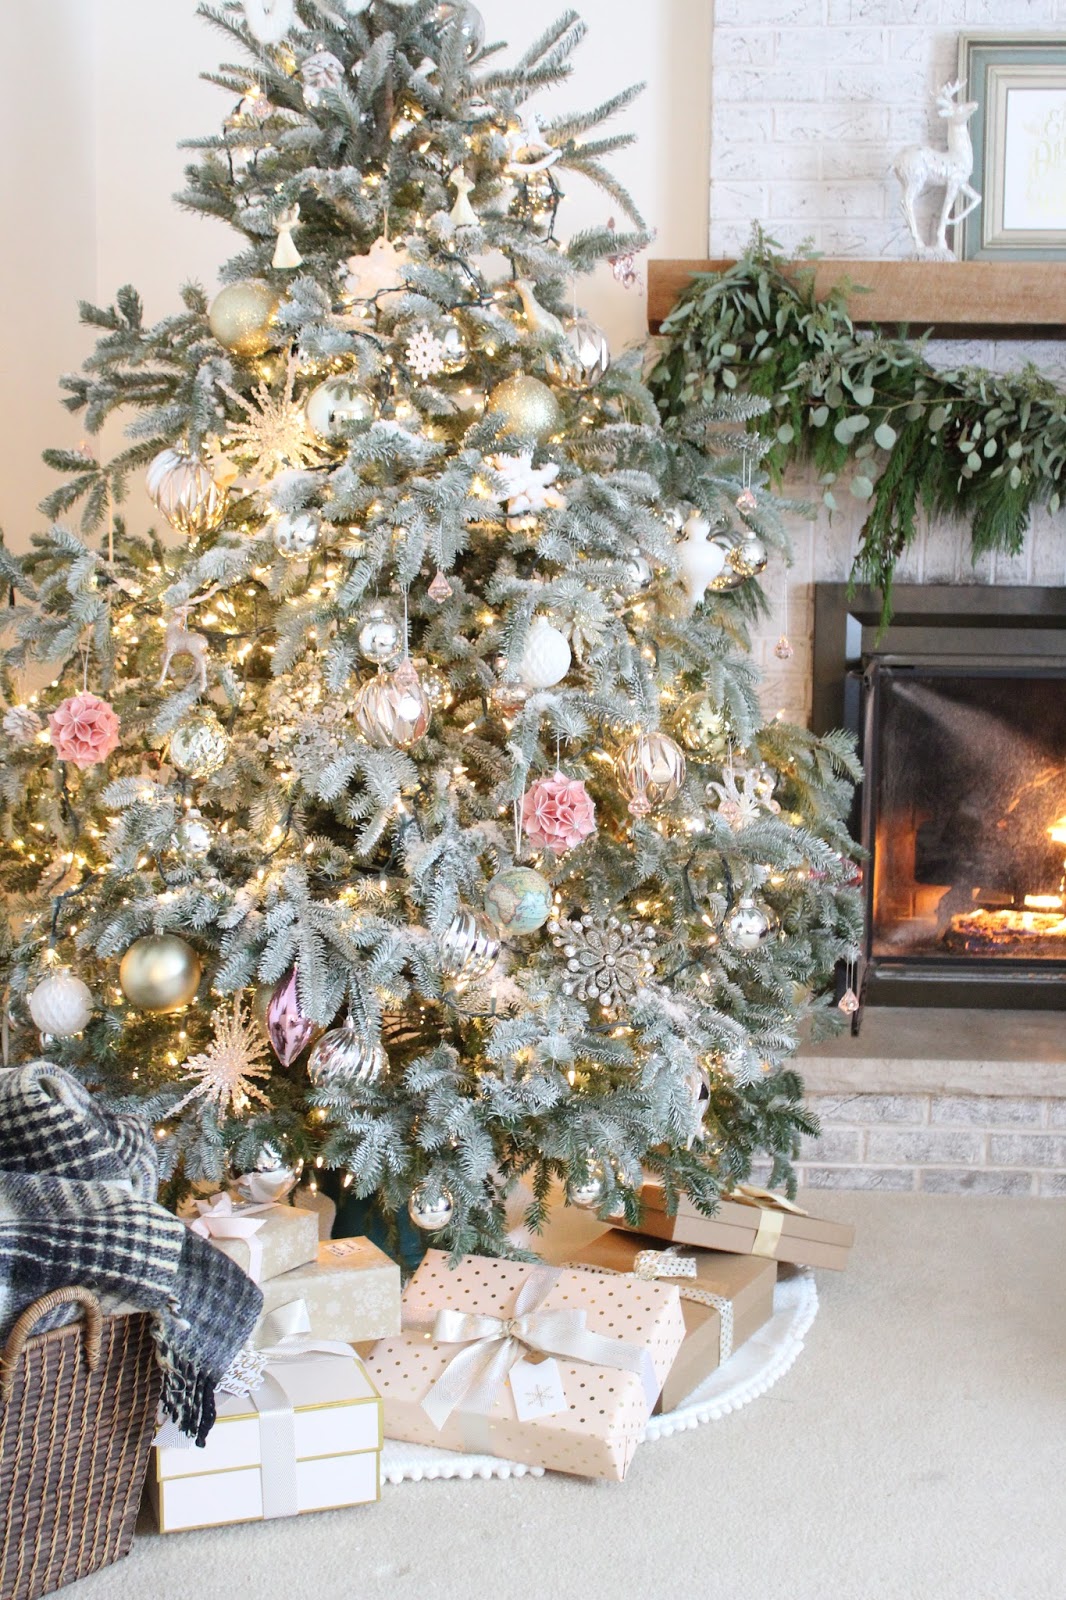
And now, my tree looks like this. It's gorgeous. It's everything I hoped it would be. I even sprinkled some bags of fake snow on it when it was done, and found blush wrapping paper from Sugar Paper so that the gifts (some of them fake) could coordinate with the ornaments just so. You'd never know all the blood, tears, and grossness that were required to make this happen. You'd never know that behind that beautiful facade, a ribbon anchored by a cinder block is the only thing holding it up. And as a blogger with a conscience, I felt it my duty to tell you that sometimes decorating comes easy. And sometimes it nearly kills you. Multiple times.


What's that? The butt story? Ah yes. Well, that was just some totally unrelated icing on the cake, but fitting considering it was earlier the same day.

I came home from dropping off my little one at preschool, and Ryan, immediately noticing a GIANT hole in the back of my jeans, said, "Um, Laura, what is that?" With trepidation I turned my rear toward a mirror and yep, about a 6" gaping gash was stretched across my right cheek. Apparently it had split sometime earlier in the day and somehow (how!?!?!?!) I hadn't noticed. And no, my choice of undergarments for the day did NOT *ahem* provide coverage.

Clearly this was an unheeded warning that I should have gone straight to bed and tried again at life another day.


He feels my shame.

Merry Season!

Monday, December 14, 2015

DIY Eucalyptus Garland


Merry Christmas! I was busy over the weekend putting the finishing touches on our decorations. Even though it feels like I put up less and less each year, I still somehow end up bombing our entire house with boxes, wrapping, general Christmas messes of all kinds, and leaves. So many leaves. 

The good news is, we have almost completely dug ourselves out from under it (though my office may need to be declared a national disaster area), and I have a super sweet and easy little DIY to share.


DIY Eucalyptus Garland

Time: 45 Minutes
Cost: $12
Skill Level: Intermediate 
Patience Level: Beach Read

Supplies:

Lightweight Fresh Greenery
Twine 
Scissors
Hot Glue Gun & Glue Sticks
Wall Hooks

Instructions:

The greenery I used for this garland is called Silver Dollar Eucalyptus. The only place I've ever seen it (without a yucky sprayed on blue-ish color coating) is at Trader Joe's. They also usually have Seeded Eucalyptus this time of year, which would be a lovely substitute or in combination. For my garland, I used TWO $2.99 bunches.


- Begin by deciding where you are going to hang it and cut a length of twine to fit your space. I knew I wanted to drape this garland over the bed in a bit of a "tent" pattern, so I made sure to allow enough twine for the swags.

- Next, cut the bottom of the stems off each spring of eucalyptus, so that each piece has leaves all the way to the end of it.


- You're going to glue the stems end-to-end along the twine. Start at one end of the twine and work your way to the other, keeping the stems going in the same direction. To hide the end of the twine, glue it to a leaf. As you work your way along, wind the twine through and around the leaves for an organic, casual feel. Dot the glue every 4 or so inches along each branch and try to place it in the more substantial parts of the branch, like where the leaves shoot off. 


- Overlap the branches just slightly so that leaves cover the ends of the stems.

- Once it starts getting long, you can lay it out along the floor to keep from getting tangled.


- You can change the direction of the last branch or two so that the open end of the twine can again be covered with a leaf, and you don't have a bare stem ending the garland.

- For hanging, I used 3M Command Hooks to create a pattern on the wall. I half-heartedly used a tape measure and mostly eyeballed it since the branches aren't perfectly straight anyway.


- Loosely fold the garland in half so you find the middle and hang it from that point on your center hook. Then you can hang one side at a time. Adjust as necessary.


Aaaaand scene. It's really simple and quick, and smells wonderful! It is also long-lasting. The color will lose its minty blue hints and fade to a more sage green over time. My sprigs from last year stayed in a vase looking lovely (without water) for months.


My daughter has already called dibs on this garland for her room after Christmas. She has also demanded I switch rooms with her, because she likes mine better. I'm not going to lie to you, that's probably the best compliment I can get on a project. :)

Enjoy the season!

Friday, November 27, 2015

Shopping for Christmas Cards with Minted


Some of you will remember my Christmas card shopping post from last year, and how difficult it was to narrow down a choice amidst all the insanely good paper companies out there these days.

This year, Minted reached out and asked if they could sponsor my Christmas cards. I'm telling you, I didn't even have to open their site before I said YES to that about 2 seconds later (they were one of my contenders last year and I regularly stalk them). I have used them countless times for art, and even though this was my first time shopping their paper, I already knew I loved their card designs.

What I didn't know was that it would STILL be nearly impossible to narrow down the choice. I thought that, being limited to shopping at one site, I would have an easy time picking a card. Nope. I wanted soooooo many of them. Here are a few I loved in particular...

Embellished Photo Card by Oscar & Emma


But you know, it changes everything when you put your own photo in, doesn't it? I always fall in love with a card only to realize the writing will be across my kids' faces, or that I don't have a shot that's the right orientation, or that I don't own a red sweater'd bulldog or a chubby baby girl sporting Freshly Picked mocs.

So here is the coolest thing. Minted lets you put in your own photo before you start scrolling through all the card options. This is a game changer. You can immediately see what designs work with what you have to work with. After I did that little maneuver, it was waaay easier to see what cards were possibilities.


All the cute foil script doesn't look so cute when it's scrawled across a forehead, huh?! ;) The great news is I didn't have to build each individual card before I realized this. Like I said, #gamechanger.

In the end, I went with a bit of a departure for me...I normally don't do pink for the holidays but this artful print with hot pink and gold foil "joy" sprawled across it just grabbed my heart. Want to see??


Oh wait, before I show you...I couldn't believe this either, but they will address your envelopes for you! FREE. You can choose from a bunch of different style options, but all their cards have matching envelope designs. And I don't know if this a special promotion or what, but as of today the option is still available for no extra charge. Hi, no brainer. I have never been this ahead of the Christmas card game in my life. You can type in names and addresses individually (like I did) or upload a spreadsheet (like a smart person would have). I can't tell you how good it felt to open the box of Christmas cards and know that I didn't have hours of addressing still to go. Even if it had cost a little extra, that feeling is worth it!

OK, now I will show you our cards. 


Aren't they cute?! My only oversight was choosing a picture where CJ's hair blended into the shadows of the tree to create a tower of lightning shooting out of his head. Doh! But hey, he has always wanted to be a superhero so we'll just go with it. Perfect Christmas cards, Minted can do. Perfect pictures of your kids...that most likely no one can do. 

So, you guys, seriously, I would recommend Minted in a heartbeat for cards. I have bought from tons of different card companies, and this one had a very user-friendly website, lots of customization options, easy ordering, delightful packaging and great customer service. (Sidenote: if you can get your butt in gear today they are having a great Black Friday sale!)

Here's wishing you a happy start to the Christmas season!

This post was sponsored by Minted, for which I am very grateful. As always, all opinions and reviews are 100% my own, and I only share companies with you that I would share with my best friends at our weekly playdate. 

 
Blogging tips