
.JPG)
i had a hard time choosing a title for this post. "fireplace brick dilemma solved." "DIY whitewashed brick." "how to lighten your fireplace brick, non-permanently, for really really cheap." wha?! yes. my fireplace is now white. and if i want to, i can change it back with a snap of my fingers and a wet sponge.
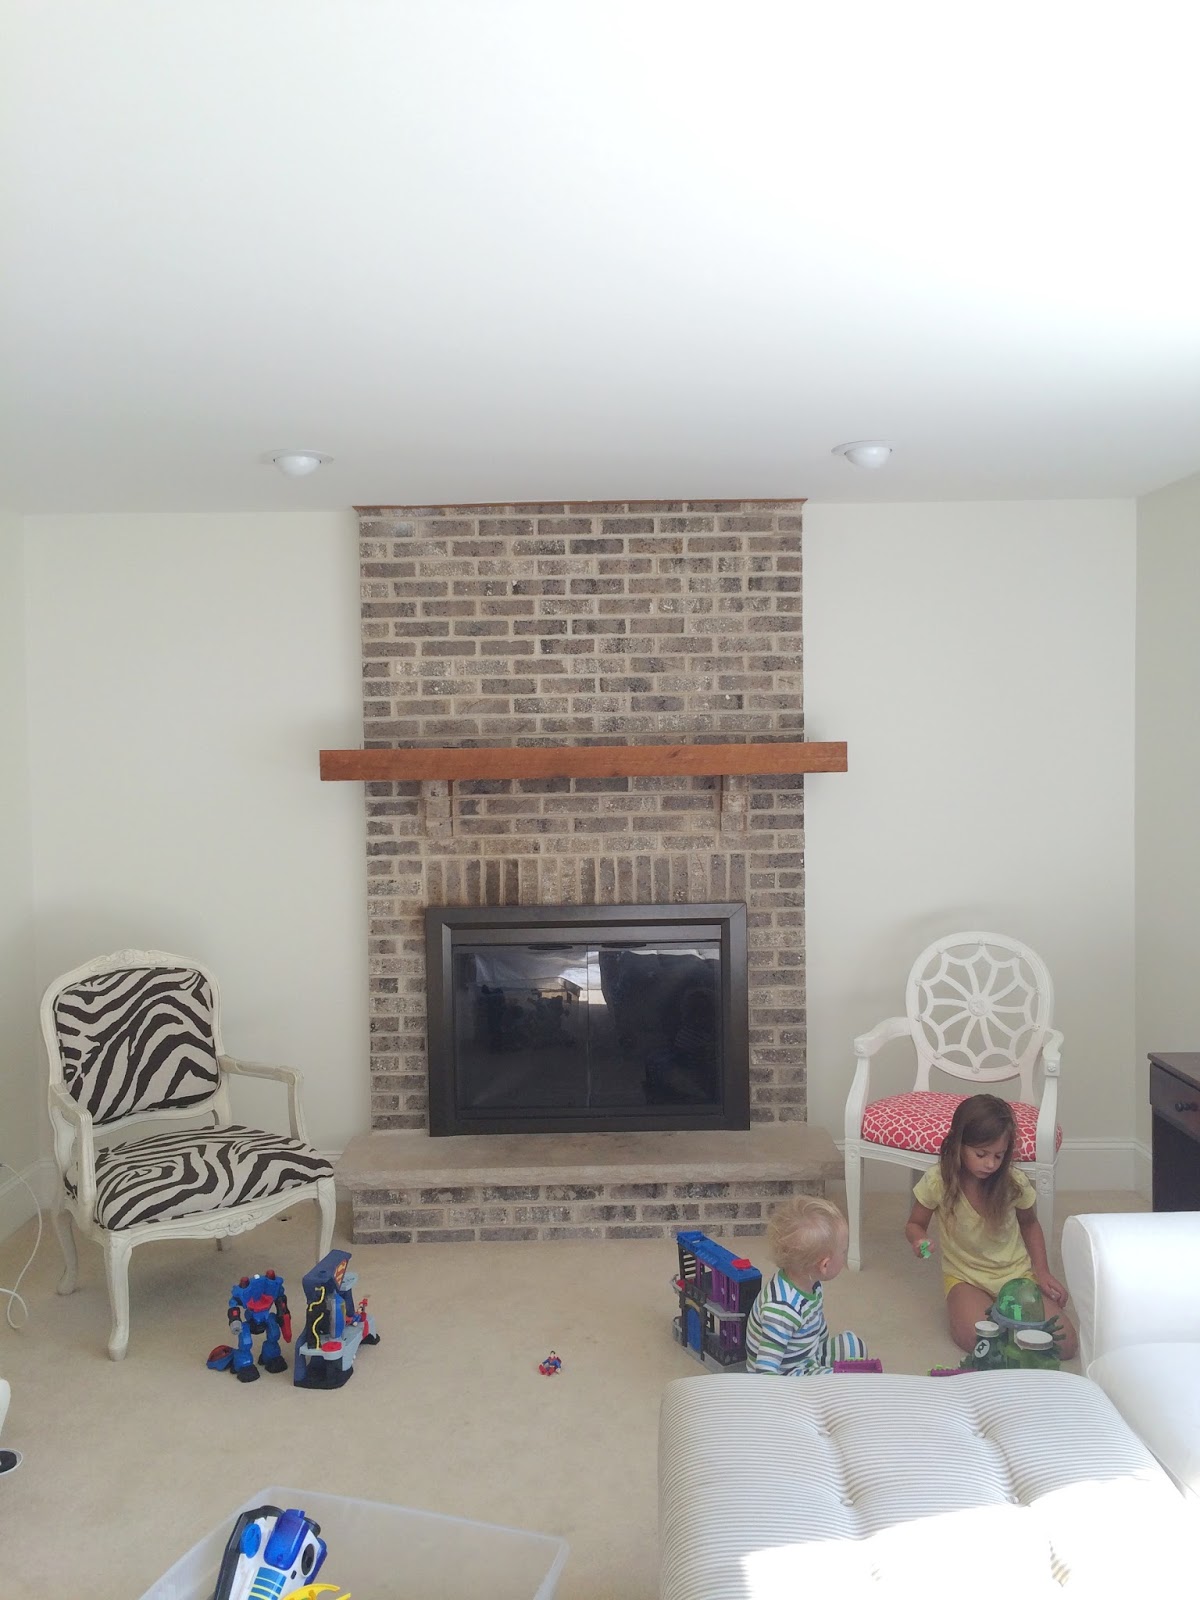
remember a few weeks ago when i was in a conundrum over what to do with this dark, outdated wall o' blah in my family room? everyone seemed in favor of lightening it up, but deep down (or not so deep down) most of us feared the permanence of that decision.
as i sat mulling it over, and dwelling on the idea of chalk painting it white, that first word started ringing in my ears. chalk. chalk. wait, a minute...chalk! i have a lot of that around here thanks to my kids. and chalk makes things whiter when it goes on things. and chalk comes back off of those things when you wash it. nah, too easy.
i ran it by ryan. free and not permanent? yeah, all for it! (you see, it's not that he's against white brick, it's just he's against doing something we'll regret later).
anyway, i tried it. and guess what? it worked! it took me exactly one hour (at first) to go over the whole fireplace with white chalk, and it was lighter, brighter, and more at home in the newly white family room. woohoo!! i couldn't believe it.
before:
after:
.JPG)
(i know, it's supposed to be whiter. keep reading). i was happy, at first, with these results. after one go-over with the chalk i liked how the mottled and varied character of the brick still showed through. i really didn't want everything to be pure covered-over textureless white. at first. keep reading.
here's the method i used:
.JPG)
2. using your fingers, rub the chalk into the brick. (i tried an eraser thinking that would spread it around without rubbing the skin off my fingers, but it didn't. the eraser erased it. go figure):
.JPG)
3. that was it. there are only two steps. it'll look like this:

4. now do it on all the bricks of your fireplace until it's light! you can apply the chalk more heavily or do a second coat to make the white more opaque (which i ended up doing. still keep reading.)
for those of you who are saying, "dude, won't that come off all over everything?" well, that is a valid concern. my answer to that is "how often are you rubbing your hands/ yourself/ your stuff on your fireplace bricks?" i have three kids and a dog who will make a mess of something just by looking at it, and they still have yet to get a drop of the chalk around the room. (i also admit i did this in a room with white walls and white couches, so i might not really notice if a few bits of chalk dust are getting on things. if you have navy walls and dark wood floors, your outcome could be different).
{oh man, now i'm paranoid. what if this gets tried and bashed by that pinterest fail lady?! i'm disclaiming now. it worked for me. try/ do/ enjoy at your own risk.}
just so you feel better about the non-permanent claim, here is what it looked like when i wiped it with a wet sponge (water only):

.JPG)
apart from a few bits of sponge debris, all better. like it never happened. here's the before and after side-by-side:

alright, here's the part you kept reading for. you noticed that doesn't look as drastic a change as the picture at the top of this post. well, remember when i said i liked the character of the brick, and liked how it wasn't pure white? well, that was true.
and. then. i. saw. this:

blurg! some days i hate pinterest. it's from a whole article on minted devoted to whitewashed brick. and sweet sassy molassey that is the fireplace i need. yep, after my eyeballs landed on that, i knew my brick was still too dark, and that really white brick was what i had been craving all along.
so back to the chalkboard (har har) i went. this time, instead of lightly rubbing with the long side of the chalk, i put tip to brick and colored as hard as i could. i burned through the box my kids had and had to buy 5 more. instead of rubbing it in with a finger, i had to use my whole palm. it took about 4 hours. my fingers bled in several places. the chalk kept snapping. there were piles of dust on the floor. i actually yelled a choice word out loud. it was not fun or pretty.
but it was worth it (and the dust vacuumed up). here is the before and the after-after:

i rubbed a bit of the dust on the mantle too, which made it slightly less offesive i think. i also made this super pinterest-friendly graphic, but then realized "easy" is kind of a relative term:

so, you know, pin responsibly. if it weren't for the non-permanence (and supreme cheapness) of this plan, paint would be a far preferable choice. but i just couldn't commit. it's possible that after living with this for a few months, we'll decide to take the plunge and paint it for real. but for now i feel better knowing that i'm getting the look without doing permanent damage. and nope, it still hasn't come off on anything.
this girl is a happy camper. my number one arch nemesis in this room has been soundly defeated. (hey, in case you're wondering i still haven't done squat with the rest of the space, and can't decide for the life of me what needs to happen with that mantle...) but hey, baby steps!


.JPG)


.JPG)


OMG! Love it! I had a white fireplace a couple homes ago and hated it. Now of course it's all the rage.
ReplyDeletelove yours!
ahh!!! you see...that is exactly what i'm talking about!! when we first moved in i was SURE i would cover this fireplace with a rustic stone facade, and now i'm all about the brick! some days i feel crazy! ;-)
DeleteYou are a genious!!!! Who knew??? I love it!
ReplyDeletethank you summer!!
DeleteOh my goodness! You clever lady you!
ReplyDeletethanks! ;-)
DeleteI love the fireplace.
ReplyDeletethank you! ;-)
DeleteThat's amazing. I was thinking about lightening my fireplace, but I just know that painted fireplaces will be out of fashion at some point and I'll want the brick back. Genius!!
ReplyDeleteoh yay! some days i think i'm crazy for overanalyzing the will-it-last-or-won't-it nature of trends (duh, they won't last, they're trends) and i wonder why i go to these lengths for non-permanence. ;-) but it's SO true...i know myself well enough to know i'll want darker bricks back two weeks after the paint has dried. i'm so glad you found this helpful! please stop back and let me know if you try it. :) xo!
DeleteI know I'm a tad late commenting but I just found this. Do you think using something like baby powder would have the same effect? I was thinking it might be gentler on the fingers and leave less residue if the kids rub against it.
ReplyDeleteHey there! Well, it can't hurt to try! The good part about these kinds of cheater solutions is, if they are an epic fail you can just fix that with a wet sponge. ;) I will say that I posted this in August of 2014 and it is now November of 2015 and the chalk STILL looks just like these pictures, without any touch-up! It hasn't rubbed off and has been a great solution. My fingerprints have even grown back nicely. :) LOL. Good luck!
DeleteA lot of work, as you say, but worth it! It totally changes the feel of the room.
ReplyDelete