

a couple weeks ago, i posted something random on facebook, and a former neighbor of mine commented on it. it occurred to me when her name popped up: she's artsy. and i bet she takes great photos. i'll look her up on instagram. well, i did, and turned out, she had a blog. i went to said blog, was blown away, and now she's my new obsession. if i can put in perspective for you how good she is, i only subscribe via email to two blogs. hers is one of them.
everyone, meet kyla from house of hipsters.
naturally i stalked her in every way possible, as one should properly behave with any blog crush. and when she suggested that i help her style a tricky desk, it took me about -2 seconds to say "yes please."
the problem was, i have these three darling children with me all the time, so it's kind of hard to find time for geek dates right now.
enter technology that solves all of life's problems. first, kyla emailed me pictures of her desk and all the things she could put on it. then, i used my ipad to mock up some options. i sent them to her, she picked her favorite, styled the desk using my photo like a map, and voila! there was a beautifully styled desk. man, if i didn't have to sleep i could do this for a living!
before this experience, i would have said "just move things around until it feels right." but that isn't really helpful advice, and it certainly wasn't working for kyla. so let me share some more specific instructions for the times you get "stuck" trying to arrange things at your house.
STEP 1 // GATHER
first of all, i believe every beautifully styled surface has four physical elements: a lamp, pretty books, flowers, and a few knick knacks that you love.
i am proud to say that kyla's project was done for $0, because she had already collected everything we used. so, start by shopping your house. gather everything you possibly can and give yourself options. this is the photo that came to me after kyla "shopped" her house:
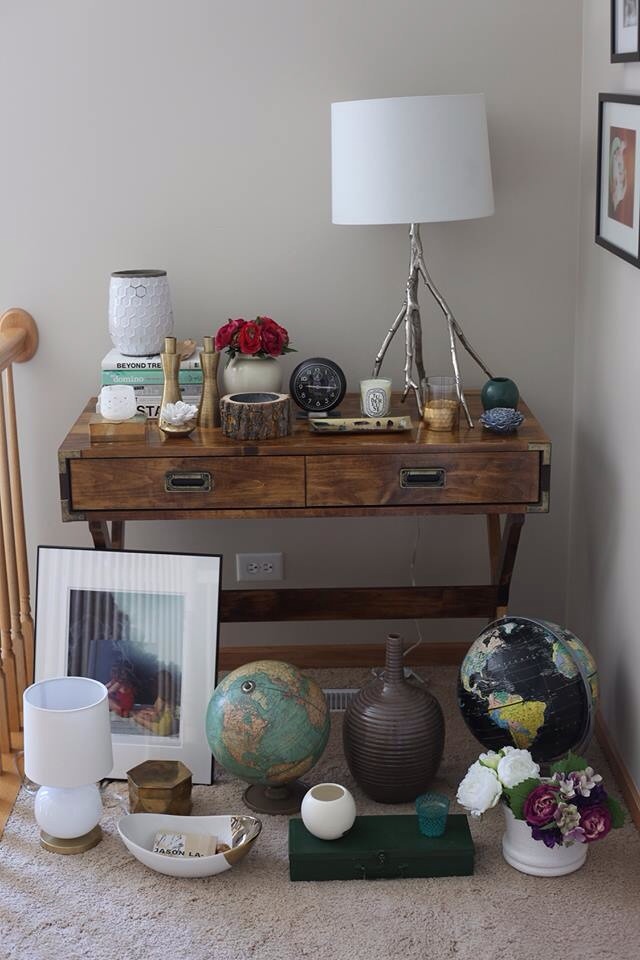
i lucked out on this project, because she had great stuff. (diptique candle! domino book)! if you feel your stuff is a little lackluster, look beyond the shell to the shape. can a little diy magic revive a piece? for instance, see that white and gold bowl up there? i'm sure you have something laying around that could look as good with a little paint. in fact, one of my first thoughts was to spray the branch lamp white (because i want to spray everything in life white; it's kind of a problem).
STEP 2 // CHOOSE
once you have everything gathered, pick out your four essentials:
A. lamp. try to choose one with some height; this should be the tallest piece on your surface.
B. books. for now, select a stack of 4-5. you can vary the height later.
C. flowers. you'll want to pick stems that match everything else you do, so just choose a vase for now and reserve some mental space to add your blooms at the end.
D. knick knacks. sort through and pull out what you love the most from among the items you gathered, and that generally "feel" good sitting next to the lamp and books you chose. i literally looked at kyla's picture and picked out my favorite things when i did this project.

{peony photo by the chic element on instagram (gorgeous feed!);
sources for all the other items are listed at kyla's blog}
a few tips:
~ mixing finishes, especially metals, adds visual interest. that is why i quickly abandoned the idea of painting the lamp (well, that, and who would paint a west-elm lamp?! only a crazy). in this case, the silver lamp, gold accessories and bronze drawer pulls keep things interesting. don't shy away from mixing it up- the overall arrangement will have more impact on your eye than making items "match." so don't worry about it.
~ a piece of art is a great jumping off point. i didn't list it as an essential ingredient, but if you're stuck and you have a piece you love, start there! kyla had just ordered this incredible elephant print, and i was so in love i had to work it in. but you could just as easily have started there and designed everything around it.
STEP 3 // ARRANGE
A. the rule of thirds
you are going to begin with the placement of the lamp (because it's the tallest/ biggest element). mentally draw lines to divide your space into thirds, and then put the lamp on one of those lines. putting your main subject at one of those points is called the "rule of thirds," and it's something photographers adhere to when composing a shot. it looks good in photos because it looks good in real life.

B. the rule of triangles
as you imagine the overall shape of your vignette, it should form a loose triangle shape with a wider base moving up to a thinner point at the top. here is how i built it for kyla:

your goal is to start adding in your favorite pieces so that they form this triangle shape. above you can see how the items i arranged (i use the poor man's version of photoshop, so forgive the quality), fit the pattern. with your taller lamp on one side, try placing your books and flowers on the other side at a lower height. about half the height of the lamp would be a good rule of thumb for those.
now you can't take it too literally. it would make more of a triangle shape to put the lamp in the exact center of the desk, but we already know that would violate the rule of thirds. that's why it's a "loose" triangle, and why "design rules" are kind of a misnomer anyways.
if you look closer, you can see "mini" triangles within the larger one.

so as you layer things in, keep that shape in mind. i realize that this is hard to do consciously, and i don't want you to physche yourself out. i still believe in moving things around until they feel right. but if you are the kind of person that needs to envision gridlines, just make sure they're in the shape of triangles.
C. the rule of odd numbers
notice that i chose the number three for small accessories. this is a good number. it easily forms the points of the triangle, and things grouped in odd numbers are more visually appealing to humans. (who figures this stuff out? the triangle thing and the odd number thing were both taught in my design classes...and continue to live in the "weird but true" part of my brain). therefore, as a rule, when you are arranging flowers, artwork, accessories, or whatever, five is better than four, and so on.
and that's the formula! another option i gave kyla still followed the rules:

how many triangles did you count?
oh! i almost forgot. you have to go back now and add your flowers. this is a great opportunity to indulge your inner commitment-phobe and give the space a continuously new look. choose blooms that pop, that coordinate with your artwork, that pull everything together, or that you just love! the only rule to follow is to toss that twelfth rose. wink.

aww, isn't she sweet? (you're welcome, friend, it looks great!)
for the rest of the reveal pictures, a list of where to get all those great kyla-curated goodies, and to tsisk tsisk her for rejecting my flower suggestion (kidding!) head over to house of hipsters.


.JPG)


.JPG)


i'm seriously so in love with this desk...i don't lie when i say i smile each and every time i look at it! thanks so much for all your help laura! you are awesome...and yes! let's do a dresser and a credenza, and another credenza and a few nightstands, and a couple side tables...oh let's just do the whole house! LOL! i'm so glad we reconnected and found time to work on this project together!
ReplyDeleteme too kyla-- it was so fun!! thanks for inviting me, and you're on! :)
Delete